Here's my lesson sheet if you want to copy it. Fair warning, when I copy and pasted it into my blog, the formatting got all ferkachte. Meh. Echt.
JoAnn
Fabric and Craft Field Trip
February
22, 2014
Sewnday
Morning Musings – Toots Hodgdon
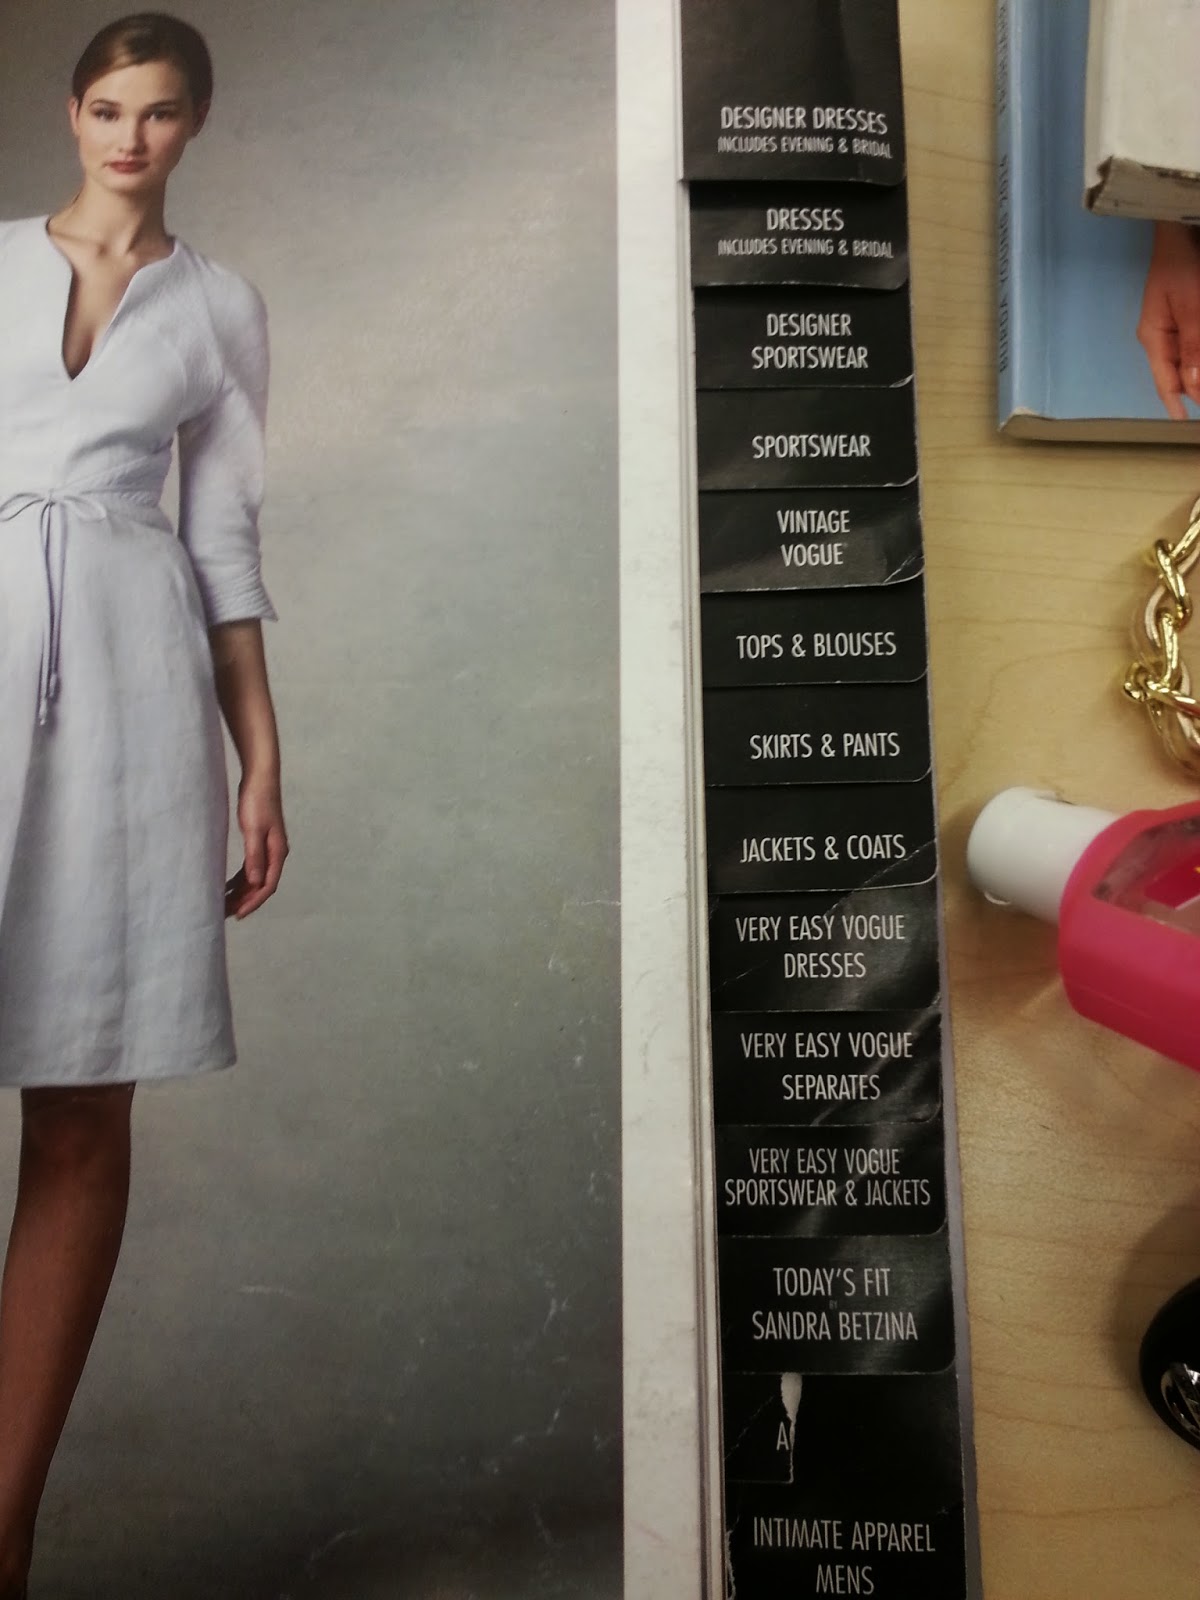
- v How do I find a pattern? - Finding patterns is pretty easy. It's a bit like going to the library and using the old Dewey Decimal System. Only not that organized. By that I mean, in the DDS books are given a number based on subject or author, patterns are given a number, but I'll be dipped if I can figure out a system.
- First, know what you're looking for. You can waste many an afternoon in the pattern books, so it's best to have a plan of attack before you head out. All of the patterns books are arranged pretty much the same.
- Beyond that, here are some other things to consider when pattern shopping:
- § Ability - all patterns will tell you their level of difficulty, usually broken down into Easy, Intermediate, Advanced and the occasional Professional. Only you know your level of expertise, so choose wisely.
- § Sizes - be sure you have accurate measurements of the person for whom you are sewing. I cannot stress this enough. Some patterns will include multiple sizes in one envelope. This rocks, you just have to make sure you have the right size range. It doesn't rock if your person is between sizes of two different envelopes. Go with the larger size. 'Tis always easier to take in than let out. Always. Don't forget that these pattern sizes are not going to correlate to your ready-to-wear sizes. Think of prom or bridal sizes. They're made to measure. Ready-to-wear sizes will fit a small range of measurements. Be prepared for your pattern size to be at least 2 numbers larger than what you get at Target or wherever. Beware of vintage patterns. The sizes are different. Always go by the measurements.
 |
| The flap is where you'll often find a measurement guide, also in metric for the rest of the world. |

From top:
Fabric suggestions - yep, the companies have designed these things with specific fabrics in mind. Not that you couldn't try it with something different, but in the design of the garment, weight, drape and stretch have been considered. It's best not to deviate too far from these suggestions.This next area shows how much fabric you need to buy for your project depending on the style (view) you're making and your size. I typically round up to the nearest half yard. You know, just in case.
Lining - Make sure you get some lining if your pattern calls for it. I personally prefer a light cotton or silk lining for just about everything. Synthetics (even the so-called cling-free kind) generate more static than natural fibers. There are some polyester linings that are called cling free - these won't cling to other fabrics but may stick to you. Hang free linings won't stick to you, but may stick to other fabrics.
Contrast fabrics - don't forget to get your contrasting fabric or overlays if your pattern requires.
Notions - Don't know why they're called notions other than it's a pretty good notion to have them to complete your project. These are things like zippers, elastics, buttons, of course thread. Be sure to use the recommended sizes and types for zippers and buttons. A longer zipper may be used, but it's not always easy to work with.

From top:
It’s how much?! - Yeah, patterns can be spendy. I personally belong to the BMV.com (Butterick/McCall's/Vogue) club and purchase most of my patterns when they're having a sale. Fabric stores will often have sale on patterns, too. Never pay full price for a pattern unless you have an emergency prom dress to make or something like that. I've also found patterns at thrift stores for less than a dollar. Sometimes you get stuck with only a portion of the pattern, but often they've never even been used.
Ability level
The DDS code - this is how you will find your pattern in the drawers.
Project descriptions by view.
Size combinations of what is in the envelope. Make sure you've got the right one.
- § What if I need more than one size? - If you need to make more than one size of the same thing, the easiest thing to do (rather than getting separate patterns - $$$) is to purchase some inexpensive muslin or gridded interfacing. Trace the patterns onto that for each one you need. Believe me, it's more cost effective than buying a bunch of patterns and cutting each size separately.
- How to read Fabric Bolt Labels

- § Size - most fabrics come in one of two widths, 45" and 60" for fashion fabric. Nearly all home decorator fabric is 60". Though you may or may not actually get that full width. The narrower fabrics may be anywhere from 40" to 45" and the wider fabrics can actually be anywhere from 54" to 60" wide for example, the above bolt label shows 057 IN (57") for the width. If you have your doubts, measure the width before you purchase. Few things are as sad as finding a fabulous fabric, getting the amount required and discovering you could really use an additional 1/8 or even 1/4 of your fabric. Also, if it's a print, measure the print area. The print may not run selvedge to selvedge (edge to edge). I've seen prints which leave up to a total of 5 inches unprinted. That's rare, but it can happen.
- § Content - Your bolt end label will tell you what the fiber content is for the fabric. Well, it should. I've seen bolt labels which read, for example: 70% polyester, 30% unknown. That's always fun. The unknown fiber will probably be another kind of synthetic if the main fiber is and most likely will be another natural fiber if the main one is. Not always the case, to be sure, but often. You can always do a burn test to figure out what fibers you've got, if you're so inclined. The above is 100% polyester.
- § Cleaning method - This is important! No, really! Think about how you care for the clothes you've already got. Are you very particular about how they're washed? Does it bother you to have to go to the dry cleaner? The bolt label will tell you how your fabric should be cared for. If it does not, but you see an alpha-numeric code (such as "D2") on the label, you can ask your person at the cutting table to look up the code for you. They should have a reference book somewhere back there that will crack the code and tell you how to wash your fabric. Don't let them tell you they don't have such a thing. They do. Oh, yes. They do.
- § Handy clues - Bolts of fabric are wound with anywhere from 10 to 15 yards per bolt. Sometimes someone will have handwritten on the end "9.5" or "9 1/2" which means the original bolt had that amount wound on it. This is often the end piece and the quality may not be consistent. Check for printing alignment. The above bolt was wound with 8 yards and it's listed on the left side. Being that it's printed and not handwritten, you shouldn't have to worry about the print.
- Occasionally you may find a brightly colored blank sticker on the end. This means that there are more than one piece wrapped on the bolt. This may mean there's a seam going across it somewhere or that there are separate pieces on the bolt. Sometimes employees will consolidate bolts and will write on the end that there's more than one piece.
- You can guesstimate how much fabric is left on the bolt board (not a tube, mind, the flat cardboards) by counting the number of layers on the fold are on one side of the board. Every two layers is approximately one yard. This can come in handy when there doesn't look like enough on the bolt.
- Which thread is the right thread for my project?
- § Seam/construction thread - Cotton or poly/cotton all-purpose. Use the 100% cotton for 100% natural fibers and the blend for synthetics and blends. This will prevent any weird shrinkage issues.
- § Quilting thread
- ¨ Hand - a bit heavier, since you won't have the double thread over and under your quilt layers.
- ¨ Machine - typically very much like 100% cotton all-purpose (I've used all-purpose for quilting in a pinch)
- § Machine Embroidery thread - usually rayon. You do not want to use this for construction sewing. It's not made for that and your seams will not be sturdy. It's made to be pretty.
- § Serger thread - Comes on cones. You can find it in either 100% cotton or in a blend to suit your needs. Most of the time you're serging knit fabrics and a lot of those are blends anymore.
- § Specialty threads - Button thread - stronger and thicker than regular thread and should be used for buttons that get heavy duty use, like on a winter coat.
- Denim thread - is made for heavier fabrics, ie denim, duck or canvas. It doesn't come in as many colors as your all-purpose variety.
- Upholstery thread - this stuff is very heavy and made for - you guessed it - upholstering furniture. You can also use it for buttons on cushions which get a lot of wear and tear.
- Tools, tools, tools!
- § I need a wha’? - There are so many tools out these days to help make the sewing process easier and faster. I'll probably end up doing a piece just on tools alone. You don't need them all.
- § Machines
- ¨ Sewing - know what you plan on sewing. Don't get more machine than you need.
- ¨ Serging - I love my serger, I really do. It's awesome for working with knits. I just wish they'd find a way to make them easier to thread and clean.
- ¨ Specialty - these can be anything from embroidery machines to long arm quilters.
- § Cut the stuff
- ¨ Blades and self-healing mats - I don't know how quilters did it before Olfa and the other blade brands came out with rotary blades and self-healing mats. Well, I do actually, and it sucked. No lie. I don't envy anyone who made quilts before these miracles came out.
- ¨ Pinker - this is the one with the ziggy-zaggy blades. They're excellent for cutting fabrics that fray easily.
- ¨ Shears - your basic cutters. I like spring-loaded ones.
- ¨ Small scissors - I have a couple pairs of small scissors, including kid's blunt point for plane rides and one for tiny detail cutting.
- § Needles - You can get universal needles for both hand sewing and machine sewing. Having a set of each is great for any sewing you might need to do, at least for a start.
- § Feet - For your sewing machine. The piece that comes down and helps to hold your fabric as it's fed through the machine is called a foot. Beyond your basic foot that came with your machine, you should have a zipper foot and a blind hem foot is a nice thing to have. Often the zipper foot comes with your machine. A button hole foot can be helpful, too. It helps you to make buttons holes in uniform sizes.
- § Marking tools - I have a blue pencil and a white pencil that can be washed out. I've found that's all I need. I used to have sheets of colored wax paper and the little pizza cutter-like tracing tool, but I've found that having the two pencils is just as effective and takes up less room. Tailor's chalk is handy for, well, tailoring and making larger marks.
- § Measuring tools - I have about a hundred cloth measuring tapes. Not really, but it seems like it. I have on upstairs, one by my ironing board, one in my travel kit, one by my machine... I have a few templates for cutting shapes for quilts, too, but you can go really crazy with those things. You can get a template for every shape you can imagine. Just go to the quilting department of your local sewing shop and you'll see what I mean. I've found that I really only need a couple of rulers and I do like my hexagons and easy Dresden templates.
- What are remnants and fat quarters, and what can I make with them?
- Remnants are pieces of fabric one yard or less. Usually they are offered at a discount.
- Fat Quarters are pieces that equal a quarter yard but are 20" x 18" instead of 9" x 40". They are almost always 100% cotton and are typically found in the quilter's department.
- § Gifts - rems and FQs are just the right size for making small gifts, bags, pillows, potholders, water and wine bottle covers, soft body dolls. The possibilities are limited only by your imagination.
- § Repairs - they are also great to have on hand for repairs. Rather than paying the price for a hunk off the bolt, check the remnant bin for a suitable fabric to patch a garment. I also prefer this to pre-made iron-on patches. By the way, the smallest amount that sellers can cut for purchase is 1/8 yard or 4.5 inches. Depending on the fabric, you may find a rem for less than you would pay for that 1/8 yard.
|
| Add caption |
I hope this helps you get ready for your next trip to the fabric store.

